Proxmox documentation is exceptional but we have created a quick guide for setting up a Windows host as it’s not the same defaults to be used when setting up Linux. For example, Proxmox will auto select q35 motherboard, and write back is apparently a must for performance. Generally though, if you want to be wise, follow the official documentation say here:
- https://pve.proxmox.com/wiki/Windows_2025_guest_best_practices
- https://pve.proxmox.com/wiki/Windows_11_guest_best_practices
They have guides for all the prior versions as well!
This article highlights the non defaults. Remember to choose the latest virtio as well, it’s this file if you click below `virtio-win-0.1.285.iso`
Table of Contents
TL;DR
- Download Windows (server = 5 GB+ / 2025 = 8.2 GB):
- https://www.microsoft.com/en-us/evalcenter/download-windows-server-2019
- When installing choose the desktop experience otherwise you’ll have no UI
- https://www.microsoft.com/en-us/evalcenter/download-windows-server-2019
- Download special disk, network, and ballooning drivers here: https://fedorapeople.org/groups/virt/virtio-win/direct-downloads/stable-virtio/virtio-win.iso
- If you’ve downloaded this before, choose IDE / local disk / virtio
- This is stored on Proxmox on /var/lib/vz/template/iso
- If you’ve downloaded this before, choose IDE / local disk / virtio
- In addition to mounting the Windows ISO, also mount that fresh ISO as IDE device #3 (some strange default occurs
- Be sure to mount the ISO when creating the VM otherwise you’ll have to reboot before the OS will recognize it.
- Ensure you select QEMU Agent on the second tab of the wizard.
- CPU
- Turn on
numa
- Turn on
- Disk settings:
- Set “Write back” as cache option for best performance
- Tick “Discard” to optimally use disk space (TRIM)
- Options
- On Guest Agent, also select: Run guest-trim after a disk move or VM migration
- Set SCSI iothread
- Turn on protection
- Turn on hotplug for memory (requires
numa) and CPU
- Driver locations on Virtio CD:
- Hard disk: vioscsi\2k19\amd64
- Network: NetKVM\2k19\amd64
- Memory Balloon: Balloon\2k19\amd64
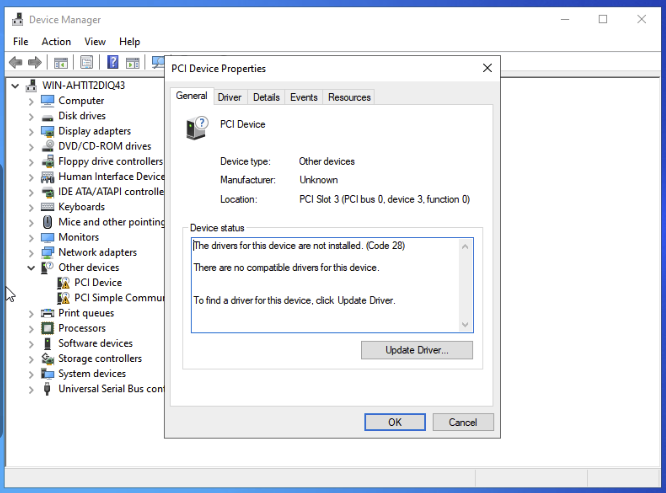
- Prep for QEMU Guest Agent
- Device Manager / Look for “PCI Simple Communications Controller”
- Update to D:\vioserial\2k19\amd64
- Device Manager / Look for “PCI Simple Communications Controller”
- You want to install all four drivers, starting with the disk driver which is needed before the disk will be seen.
- Choose SCSI bus as you normally would for the disk
- Choose this network device: VirtIO (paravirtualized)
Proxmox Wizard Steps
Use the “q” motherboard as Proxmox will guide you. Use EFI.
If you are import an existing QCOW2, then you probably only need the Proxmox wizard stuff to fill in:
- General Tab
- Name
- OS Tab
- Do not use any media
- Guest OS: Microsoft Windows version 10/2016/2019
- System Tab
- Tick Qemu Agent
- Hard Disk Tab
- Bus/Device: SCSI. That will default next line to VirtIO SCSI
- Set iothread
- Storage: raid1 or whatever volume you decide on
- Cache: Write back
- Discard: Tick this
- Bus/Device: SCSI. That will default next line to VirtIO SCSI
- CPU
- Memory
- Network
- VirtIO (paravirtualized)
Proxmox Wiki Guides
- https://pve.proxmox.com/wiki/Windows_2019_guest_best_practices
- https://pve.proxmox.com/wiki/Windows_10_guest_best_practices
Further Steps
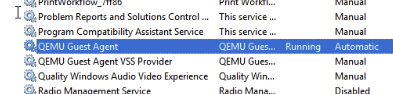
Install QEMU Guest Agent for Windows
- Make sure you’ve followed the step to update the unknown PCI Simple Communications Controller as per previous step
- Browse to the ISO and guest-agent and install the 64bit guest agent.
- Test so:
- Services or Powershell
- Get-Service QEMU-GA
- Services or Powershell
Memory Ballooning
You should also install the VirtIO Balloon Driver to avoid an exclamation mark in your Device Manager.
Browse to the CD, Balloon, your OS, and then amd64 folder.
VirtIO Serial Driver
That’s the other exclamation mark, “PCI Simple Communications Device”.
Simply specify to browse the root of the CD to install that.
Allow Ping for Windows Server 2019
By default Windows Server 2019 doesn’t allow ping. If you want to set it, do this:
https://kb.vander.host/operating-systems/unable-to-ping-newly-installed-windows-2019-server/
Enable Remote Desktop Connection
You probably want RDP enabled:
- Server Manager
- Local Server
- Remote Desktop will be disabled. Enable it by clickon the ‘Disabled’.
Group Policy Changes
Allow More Than One RDP Connection
- Start / Run / gpedit.msc
- Navigate to Computer Configuration >> Administrative Templates >> Windows Components >> Remote Desktop Services >> Remote Desktop Session Host >> Connections.
- Double click on “Restrict Remote Desktop Services user to a single Remote Desktop Services session and set this to Disabled.
- Next, double click on “Limit number of connections”, Enable, and set the RD Maximum Connections allowed to the maximum which is 999999 (6 x 9s).
Account Lockout
Some people like to have RDP on exposed on the internet. Your server will immediately become part of a dictionary attack. Very soon the lockout policy of RDP security will be reached. If you really have to, you can follow the route below:
Settings > Edit Group Policy
Group Policy > Computer Configuration > Windows Settings > Security Settings > Account Policies > Account Lockout Policy > Account Lockout Threshold