Table of Contents
The Story of Cloud-Init Images at Vander Host
This is an article about the preparation of Cloud-init images for a Proxmox server to automate the deployment of virtual machines. It covers a few common operating system environments such as Debian, Ubuntu, AlmaLinux, Rocky Linux, and CentOS. Vander Host supports all these templates for any of our VPS hosting services and we use these scripts and variations thereof to ensure that our clients have access to the latest operating systems. We publish the scripts here for transparency. If you require any operating system template, let us know and we will be happy to provide it.
TL;DR
- We have the main script below which branches off according to distribution ancestry.
- Both derivatives used to work well with
virt-customizewhich requiredlibguestfs-toolsto be installed. However, recent (2026) AlmaLinux Cloud-init templates are more problematic so for them we useguestmount.
List of Templates
Last updated 2 April 2026 – added Ubuntu 24.04
- Debian-13
- Debian-12
- Debian-11
- Debian 10
- Ubuntu 24.04
- Ubuntu-22.04
- Ubuntu-20-04
- RockyLinux-9x
- AlmaLinux-10
- AlmaLinux-9
- CentOS-7
We also have Windows templates and can install any other template that you require.
Template Check List 1
- Is
,ssd=1? It seems no matter what you do on the template, it is still overridden when you deploy. - Is
protectionenabled? - Is SCSI Single?
- Are these installed:
qemu-guest-agent,mc,parted,spice-vdagent? - How about NUMA?
- Hotplug. Memory issues and Hotplug?
- Can you SSH with password?
- What is the deployment username?
- Preferred username: rocky or whatever (as per /etc/cloud/cloud.cfg)
Template Check List 2
- Add to Config Option: VM Template|VM Template Debian-13/Debian-13
- Options:
qemu-guest-agentenabled?- trim?
- freeze thaw?
Screenshots available upon request.
Post Creation Checklist
- PermitRootLogin prohibit-password
- SSD = 1 no more
- Guest agent stuff no more
- Username not
debian, should be set in system - IP Management system for IPv4 and IPv6
- Default Display instead of Serial, why do we use it?
spice-vdagent- Automatic key addition
Updated 2026 Script
Change Log
02 April 2026
- Removed memory hotplug before regenerating Ubuntu 24.04 image
- Add branching for Debian derivitas
- Removed older script
- Added recurse search for PasswordAuthentication
- Tried changing IDE2 to SCSI2, didn’t work
Mount Method
This one doesn’t use libvirt-customize so no need for the apt command.
#!/bin/bash
set -e

DEFAULT_STORAGE="nasXX"
DEFAULT_PKGS_RPM="qemu-guest-agent mc parted mutt"
DEFAULT_PKGS_DEB="qemu-guest-agent mc parted mutt spice-vdagent"

read -p "Storage [$DEFAULT_STORAGE]: " STORAGE
STORAGE="${STORAGE:-$DEFAULT_STORAGE}"

read -p "Image: " IMAGE
read -p "VM ID: " TEMPLATE_ID
read -p "Friendly name: " FRIENDLY_NAME

echo "OS family?"
select OS_FAMILY in "RedHat (dnf)" "Debian (apt)"; do
    case $REPLY in
        1) OS_FAMILY="redhat"; break;;
        2) OS_FAMILY="debian"; break;;
    *) echo "Please select 1 or 2";;
    esac
done

if [ "$OS_FAMILY" = "redhat" ]; then
    DEFAULT_PKGS="$DEFAULT_PKGS_RPM"
else
    DEFAULT_PKGS="$DEFAULT_PKGS_DEB"
fi

read -p "Packages to install [$DEFAULT_PKGS]: " PKGS
PKGS="${PKGS:-$DEFAULT_PKGS}"

# --- Customise image ---

if [ "$OS_FAMILY" = "debian" ]; then
    PKGS_CSV="${PKGS// /,}"
    echo "Customising image with virt-customize..."
    virt-customize -a "$IMAGE" --install "$PKGS_CSV"

    # Fix PasswordAuthentication in main sshd_config
    virt-customize -a "$IMAGE" --run-command \
        "sed -i 's/PasswordAuthentication no/PasswordAuthentication yes/g' /etc/ssh/sshd_config"

    # Fix Ubuntu/newer Debian drop-in override (e.g. 60-cloudimg-settings.conf)
    virt-customize -a "$IMAGE" --run-command \
        "find /etc/ssh/sshd_config.d/ -type f -exec sed -i 's/PasswordAuthentication no/PasswordAuthentication yes/g' {} +"
else
    MOUNTPOINT=/mnt/guestimage
    mkdir -p "$MOUNTPOINT"
    echo "Mounting image..."
    guestmount -a "$IMAGE" -i "$MOUNTPOINT"

    echo "Configuring image..."
    echo 'nameserver 1.1.1.1' > "$MOUNTPOINT/etc/resolv.conf"
    chroot "$MOUNTPOINT" dnf install -y $PKGS
    chroot "$MOUNTPOINT" dnf clean all

    # Fix PasswordAuthentication in main sshd_config
    sed -i 's/PasswordAuthentication no/PasswordAuthentication yes/g' \
        "$MOUNTPOINT/etc/ssh/sshd_config"

    # Fix drop-in overrides (e.g. AlmaLinux 9's 50-cloud-init.conf)
    find "$MOUNTPOINT/etc/ssh/sshd_config.d/" -type f \
        -exec sed -i 's/PasswordAuthentication no/PasswordAuthentication yes/g' {} + 2>/dev/null || true

    echo "Unmounting image..."
    guestunmount "$MOUNTPOINT"
fi

# --- Create VM template ---

echo "Creating VM template..."
qm create "$TEMPLATE_ID" --memory 2048 --net0 virtio,bridge=vmbr0
qm importdisk "$TEMPLATE_ID" "$IMAGE" "$STORAGE"
qm set "$TEMPLATE_ID" --scsihw virtio-scsi-single --scsi0 "$STORAGE:vm-$TEMPLATE_ID-disk-0",ssd=1,discard=on,iothread=1
qm set "$TEMPLATE_ID" --ide2 "$STORAGE:cloudinit"
qm set "$TEMPLATE_ID" --boot c --bootdisk scsi0
qm set "$TEMPLATE_ID" --serial0 socket --vga serial0
qm set "$TEMPLATE_ID" --cpu host --numa 1
qm set "$TEMPLATE_ID" --hotplug cpu,disk,network,usb
qm set "$TEMPLATE_ID" --acpi 1
qm set "$TEMPLATE_ID" --protection 1
qm set "$TEMPLATE_ID" --name "$FRIENDLY_NAME"
qm template "$TEMPLATE_ID"

echo "Done. Template $TEMPLATE_ID ($FRIENDLY_NAME) created."
MikroTik
#!/bin/bash
ver=7.20.4 # check mikrotik.com/download for latest stable CHR
wget https://download.mikrotik.com/routeros/$ver/chr-$ver.img.zip
unzip chr-$ver.img.zip

VMID=9024 # pick your template ID
qm create $VMID --name "chr-$ver" --ostype l26 --memory 256 --cores 2 --cpu host
qm set $VMID --net0 virtio,bridge=vmbr0
qm set $VMID --serial0 socket --vga serial0
qm set $VMID --scsi0 YOUR_STORAGE:0,import-from="$(pwd)/chr-$ver.img",discard=on
qm set $VMID --boot order=scsi0 --scsihw virtio-scsi-single
qm disk resize $VMID scsi0 8G # default disk is only ~89MB
qm template $VMID
Interaction in real-time with the image
guestfish -a Rocky-9-GenericCloud-Base.latest.x86_64.qcow2 -i
vi /etc/ssh/sshd_config
Caveats AlmaLinux 9
- AlmaLinux crashed with stock KVM64 CPU! The template has to be updated with Host. That’s because the Cloud-init template was compiled expecting certain CPU flags.
- AlmaLinux 9 includes
/etc/ssh/sshd_config.d/50-cloud-init.confspecial include directory which overwrites PasswordAuthentication. So even after getting the VM, the password login doesn’t work. Adding a key was the only way. - Finally, still having NUMA and memory problems as with many other templates. Considering dropping both NUMA.
- Will have to check ACPI as well.
- Bottom line: template not mature enough for AlmaLinux 10 – needs a lot more work. For now, just updating the Template already present.
PasswordAuthentication no
Try this: https://forum.proxmox.com/threads/cloud-init-replaces-overwrites-passwordauthentication.57145/
Updated Script: https://github.com/Razva/newbadmin/blob/master/proxmox/cloudinit-generator
- Example:
- guestfish -a alma9.qcow2 -i
- check settings
- cat /etc/ssh/sshd_config | more
- #PasswordAuthentication yes
- #KbdInteractiveAuthentication yes
- check settings
- virt-customize PasswordAuthentication? ChallengeResponseAuthentication? UsePAM? Fix cloud-init
- virt-customize -a alma9.qcow2 –run-command “sed -i ‘s/#PasswordAuthentication yes/PasswordAuthentication yes/g’ /etc/ssh/sshd_config”
- virt-customize -a alma9.qcow2 –run-command “sed -i ‘s/#KbdInteractiveAuthentication yes/KbdInteractiveAuthentication yes/g’ /etc/ssh/sshd_config”
Caveats Debian Bookworm
Customization explanation:
- Allow SSH
PasswordAuthenticationby using SED find and replace. Please note, this is a security risk. If you are going to forget to disable it after you have added keys, then rather just work with keys. - Optional for Virtualmin quotas (older versions)
- linux-image-generic
- virt-customize -a debian-12-generic-amd64.qcow2 –run-command “sed -i ‘s/PasswordAuthentication no/PasswordAuthentication yes/g’ /etc/ssh/sshd_config”
On Proxmox, you’ll also want to turn on protection and enable the QEMU Guest Agent with fstrim_cloned_disks: Enabled
Notes
virt-customize
- See: https://registry.terraform.io/modules/sdhibit/cloud-init-vm/proxmox/latest/examples/ubuntu_single_vm
- Added information about /etc/cloud/cloud.cfg
- https://forum.proxmox.com/threads/cloud-init-replaces-overwrites-passwordauthentication.57145/
A note about Hot Plug
If you want to use Hot Plug on Debian, be sure to read this part of the Proxmox manual that suggests for CPU hotplug, you have to modify the guest. However, in my experience, you don’t. I just works.
https://pve.proxmox.com/wiki/Hotplug_(qemu_disk,nic,cpu,memory)#Kernel_5.15_and_newer
For Linux kernel >=5.15 (e.g. Ubuntu 22.04) you only need the UDEV rule for CPU hotplug:
/lib/udev/rules.d/80-hotplug-cpu.rules
SUBSYSTEM=="cpu", ACTION=="add", TEST=="online", ATTR{online}=="0", ATTR{online}="1"
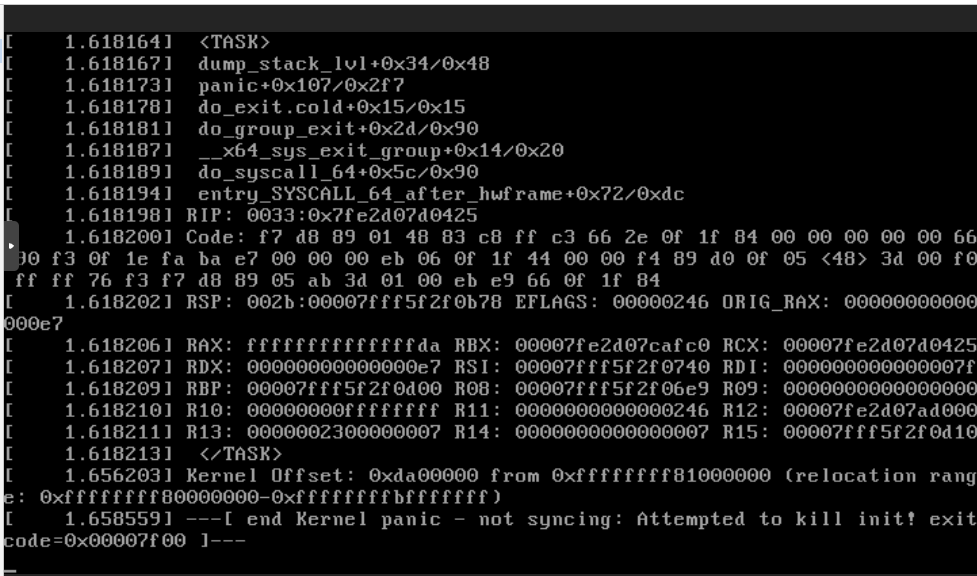
Problems with AlmaLinux
AlmaLinux crashes if the CPU isn’t host. You’ll get a Kernel panic on startup. This is well documented on the Proxmox website:
https://forum.proxmox.com/threads/kernel-panic-installing-rocky-or-almalinux.114885/
Here is a screenshot:
2 thoughts on “How to prepare a Cloud-Init Templates with Proxmox”
Hello.
Please, change “–” > “-”
Example:
“–memory” > “-memory”.
Thank you! I noted some pre tags were missing and fixed the problem.