Table of Contents
Introduction
Changes
- On 4 June 2024 this article was updated to provide more information with regards to running TrueNAS scale as a VM, and also which fields to complete during the VM creation process.
- On 4 April 2024 this article was updated to change all references of TrueNAS Core to TrueNAS Scale.
Original Introduction
I became a fan of TrueNAS Scale working in conjunction with Proxmox and iSCSI. Getting to this point has been a long and hard journey, I would say about a year of toying around and figuring out what will work for us in our data centre for Virtual Machines. The journey started by evaluating Synology and QNAP. QNAP makes incredible products and so does Synology, but in the end I spent a lot more time on Synology because we have a local distributor that sells the equipment and it seemed a bit more accessible.
Eventually I gave up on Synology. I watched so many videos about it, and I made a number of enquiries, but none of my enquiries were ever completely satisfied. QNAP was also an option but at some point I learnt that QNAP is more “somewhat proprietary” (e.g. 10git/s interface) so I stopped liking it.
The breakthrough came when I found TrueNAS Scale and TrueNAS Core. I’m a huge fan of open source and we have 100s of servers running Ubuntu derivatives. I also adore Proxmox VE and my idea was to combine both for the best of both worlds.
Before you read to far I must point I have a very specific application – I want super fast virtual machines with tons of redundancy, backup, and portability. I’m not a home user who wants to store my movies. Unfortunately once you Google and start watching Youttube videos you quickly learn that the most popular Youtube videos are based around this “I want big storage” and “home server” crowd.
My application is different – our business has many data centres and we needed something very specific for our environment. I think in all honesty if I had $10K or $20K, I would have probably bought something off the shelf. The problem is even buying something off the shelf is hard and if you spend that kind of money, you probably don’t want to make too many mistakes. It’s incredible hard to find a specialist in this field, and of course you’ll learn a lot via Youtube but doing it yourself is the ultimate learning school. In retrospect from what I’ve learnt now after having installed my 3rd NAS in a super intensive environment, I wouldn’t have it any other way.
In the end I’m thankful I discovered TrueNAS because I could utilize my entrenched systems administration skills to get going.
One of the final hurdles I faced was should I use NFS or should I use iSCSI. My first attempt at iSCSI was a dismal failure but I got NFS working. What I found however is NFS seemed a bit slow and when I enquired about the different some users pointed out that iSCSI is better. There you go, apparently it is:
Most of the rest of this article is a mashup of all the technical information I found on this journey. There is a lot of publicly available information on the Internet and the goal of this article is to document as much as possible about running your own TrueNAS Scale using Proxmox and iSCSI. I’m particularly thankful to the Proxmox forum and @thegrandwazoo for the information I found provided by those avenues.
A big shoutout to NAS Compares as well. These guys are incredible and they have every conceivable Youtube video about NAS stuff when you start Googling. They have free / donation based user-friendly “Contact Us” line as well, and twice I sent them personal questions in my quest and twice I got great replies. I also donated to their cause. It’s just their information was a bit overwhelming and I think it’s mostly aimed at the mainstream. My specific user case seemed too narrow for the information they supplied. Also their pages are so text heavy, for example this one:
https://nascompares.com/tag/synology-vs-qnap/
Or this video:https://www.youtube.com/watch?v=3cdzP8YvWt8
The information is useful, but it’s just too much, too quick. I guess “NAS” is a complex topic so that’s the way it will be with ‘getting advice’ on the Internet.
Why TrueNAS Scale and not TrueNAS Core?
I started off using TrueNAS Core because it seemed sort of default. Eventually I discovered Scale which is also free and seems a lot more powerful:
TrueNAS SCALE is the latest member of the TrueNAS family and provides Open Source HyperConverged Infrastructure (HCI) including Linux containers and VMs. TrueNAS SCALE includes the ability to cluster systems and provide scale-out storage with capacities of up to hundreds of Petabytes.
Well since we’re running data centres having great scalability seemed wise. But the huge drawcard to me was that it’s Debian based. TrueNAS Core is built using FreeBSD and although I’m all for “let’s have a gazillion Linux distros” life is short and there was a lot to learn. Working with a new distribution on basic things like networking or firewalls is just a pain if your actual goal is something entirely different.
Why ZFS?
This was another mystery question that eventually got solved by just pushing through. From what is seems the combination of TrueNAS and ZFS means you have a very advanced ‘network disk operating environment’ that has many great redundancy and performance features. To be honest a lot of the file system information is totally overwhelming but with time it became certain that ZFS is the way to go. To be even more specific, we’ve chosen the default of ZFS RAID5, also known as RAIDZ1.
To me at least, it seems, ZFS was designed from the ground up to be a performed file caching system with great memory features. Specifically, there is the ARC – Adaptive Replacement Cache, which includes many tools to measure performance. To be honest, I have never explored them completely because I believe a product such as TrueNAS Scale should automatically be set up to have the greatest defaults. If, however, you want to learn more, I propose you see this ChatGPT output: https://chatgpt.com/share/f2f3f9aa-aee8-47e1-894d-5710fba94870
The ideal situation would be to utilize the TrueNAS Scale UI to quickly see exactly how much memory / caching is taking place. As of this time, I am not so sure if this is shouting at me when I log in. However, and without much further ado, here goes:
Install Proxmox VE
Install Proxmox VE as per usual. On my original install a I had to revert to version 7.4 because of a cluster. After many tense and sometimes failing upgrades I eventually migrated everything in the cluster to 8.x.
Configure Proxmox VE to work with iSCSI
Proxmox VE supports many different file systems and although the TrueNAS application seems popular, they don’t have specific documentation on how to get iSCSI working with it. However, Kevin Scott Adams has created a Perl helper to do all the heavy lifting using the TrueNAS API.
There is actually some documentation on ZFS over iSCSI, but it doesn’t include the specific instructions for TrueNAS:
Legacy documentation:
https://pve.proxmox.com/wiki/Legacy:_ZFS_over_iSCSI
points to:
https://pve.proxmox.com/wiki/Storage:_ZFS_over_ISCSI
But we choose to do it using the instructions below:
On the Proxmox VE server
Install Kevin’s plugin:
https://github.com/TheGrandWazoo/freenas-proxmox
Set keyring location and load GPG key:
keyring_location=/usr/share/keyrings/ksatechnologies-truenas-proxmox-keyring.gpg
curl -1sLf 'https://dl.cloudsmith.io/public/ksatechnologies/truenas-proxmox/gpg.284C106104A8CE6D.key' |  gpg --dearmor >> ${keyring_location}
cat << EOF > /etc/apt/sources.list.d/ksatechnologies-repo.list
# Source: KSATechnologies
# Site: https://cloudsmith.io
# Repository: KSATechnologies / truenas-proxmox
# Description: TrueNAS plugin for Proxmox VE - Production
deb [signed-by=${keyring_location}] https://dl.cloudsmith.io/public/ksatechnologies/truenas-proxmox/deb/debian any-version main

EOF
apt update
apt install freenas-proxmox
TheGrandWazoo Dropdown
Kevin’s library installs a number of Javascript and Perl routines to give you a sexy new “FreeNAS-API” dropdown option when you select ZFS over iSCSI in the Proxmox user interface:
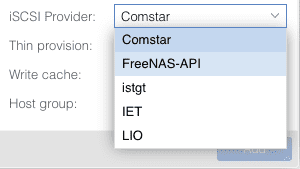
If you’re not getting the dropdown, it means the plugins Javascript files aren’t being loaded successfully. Log out and log back into the hypervisor and it should appear, otherwise go back to what you did and see if you encountered any errors.
Install TrueNAS Scale
One caveat I ran into was you can install TrueNAS Scale on dedicated hardware, or you can actually install it as a virtual machine. The second option seemed quite interesting to me, but I couldn’t exactly grasp why. In general I believe virtualization is always better in spite of a small overhead of the hypervisor. I would go as far as using virtualization even when I’m going to be installing just one operating system. Anyhow, for now this tutorial doesn’t cover this scenario and is rather focussed on getting the iSCSI bits working.
https://www.truenas.com/download-truenas-scale/
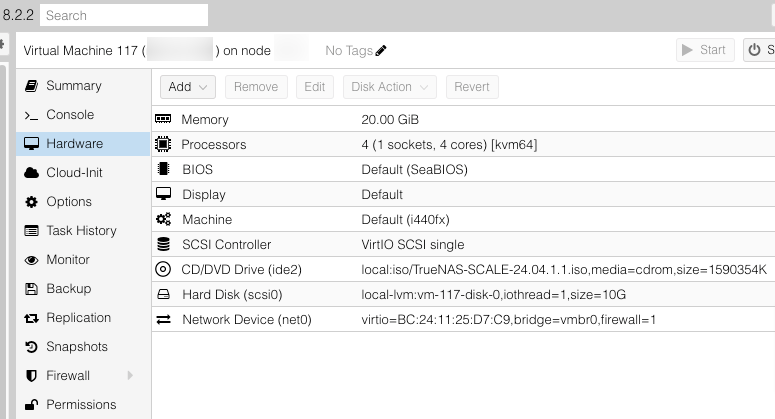
Create a VM. I used a 10GB disk with all the defaults, 4 processors, and 32 20 GiB RAM.
When I started this exercise, I read the TrueNAS Scale requirements and it was unclear how much RAM to use. Basically it said “use a lot”. But after running two of these NASses for a long time I can categorically state that the one never uses more than 17.25 GB RAM and the other never more than 18.38. the graphs are peculiarly constant in their usage. So my recommendation is use 20 GiB of RAM:

Have I gained a lot more by running TrueNAS as a VM? What about the performance penalty of the hypervisor?
To be honest, sometimes one just don’t have access to dedicated hardware so for now this is definitely my preferred way. One day I might be able to benchmark dedicated hardware versus via a hypervisor, but to be honest, I don’t think there can be a huge performance penalty. In my opinion the bottleneck is always disks first, e.g. use NVME, and then network, e.g. use 10 Gbit or more.
One clear benefit of using a VM is you can reinstall over and over again to learn.
The Create VM Wizard
The create VM wizard will ask a few questions that has to be answered properly to get the best out of the system. Here are the defaults I use:
- General
- Name: nasxx-location-#
- Start at boot ✅
- System
- Qemu Agent ✅
- Disks
- VirtIO SCSI Single (the default, it seems you can’t choose anymore)
- 10 GiB Disk Size
- IO thread (the default)
- CPU
- Default (KVM64) or “Host”
- 1 Socket, 4 Cores
Before using the TrueNAS Scale install wizard, we will pass through the drives by interrogating their serial numbers:
Passthrough Disks
This has to be done on the VM host. You can use the command below or navigate the UI on the host to Root => Disks where there is a model and serial column.
# lsblk -o +MODEL,SERIAL,WWN
sdb 8:16 0 7.3T 0 disk HGST_ VYJTWE 0x123
sdc 8:32 0 7.3T 0 disk HGST_ VYJTVD 0x456
sdd 8:48 0 7.3T 0 disk HGST_ VYJU0H 0x789
Then:
# ls -l /dev/disk/by-id
total 0
lrwxrwxrwx 1 root root 9 Apr 3 21:39 ata-HGST_HUS728T8TALE6L4_X -> ../../sdc
lrwxrwxrwx 1 root root 9 Apr 3 21:39 ata-HGST_HUS728T8TALE6L4_Y -> ../../sdb
lrwxrwxrwx 1 root root 9 Apr 3 21:39 ata-HGST_HUS728T8TALE6L4_Z -> ../../sdd
In the command below, if you’ve already created the VM on SCSI0, you’ll have SCSI1 to use:
I’ve re-ordered mine so that B,C, and D are sequential:
qm set 124 -scsi1 /dev/disk/by-id/ata-HGST_HUS728T8TALE6L4_Y
qm set 124 -scsi2 /dev/disk/by-id/ata-HGST_HUS728T8TALE6L4_X
qm set 124 -scsi3 /dev/disk/by-id/ata-HGST_HUS728T8TALE6L4_Z
SSD Emulation / IO Thread / Discard
According to WunderTech you also have to do this:
One important option is SSD Emulation. If it’s important for the VM to think the disk size is what is specified (rather than the full disk of the storage selected), enable SSD Emulation! You can also disable backups in this section (if you’re backing up your VMs to a NAS or other server).
To be honest, I believe this would require more research for our environment, but since I’ve heard about the SSD Emulation before I guess this will be fine.
For Proxmox docs on this, see here (no mention of SSD Emulation):
https://pve.proxmox.com/wiki/Passthrough_Physical_Disk_to_Virtual_Machine_(VM)
From their forum though:
“SSD Emulation” only tells the guest OS to treat the disk as a non-spinning disk (afaik it just sets the rotation rate to 0). It really shouldn’t matter for most situations.
“Discard” on the other hand has a noticeable effect, read our documentation for more on that.
IO Thread / Discard
After having carefully read the documentation, to me at least it made sense to enable both IO Thread and Discard.
Installation of TrueNAS Scale
At this point, you should install TrueNAS Scale. Don’t select any passthrough disks for your installation, because those will be used for ZFS. So choose only your operating system disk.
Wizard options
- Administrative user: Typically Admin is used but note, TheGrandWazoo plugin refer to root login too.
- Make sure you have a secure password and store is safely
- Stick with the default on Proxmox to allow EFI boot.
TrueNAS Core IP Address Configuration
By default the network will be configured for DHCP. You then have to login and navigate to the menu to set IP address (called an alias) and default gateway. This will also allow you to test. Once you have switched to the correct IP, go back quickly within 60 seconds and save the config.
Next, set the name servers to 1.1.1.1 and 8.8.4.4.
Get SSH login working to TrueNAS
Next next step is to get iSCSI working is to allow the Proxmox server to communicate seamlessly with the TrueNAS server using SSH. SSH is used because:
“…plugin uses TrueNAS APIs but still uses SSH keys due to the underlying Proxmox VE Perl modules that use the
iscsiadmcommand.”
In other words information exchange over SSH has to take place, in addition to the TrueNAS “API” being invoked.
What makes getting SSH working more complicated than usual is multiple warning and settings on the TrueNAS side that has to be avoided.
- First of all, TrueNAS shepherds you into using admin instead of root.
- TrueNAS also has SSH disabled, and root logins are not allowed. So adding the key isn’t so straightforward until these things are addressed.
The setup for SSH refers to this Proxmox VE document: https://pve.proxmox.com/wiki/Storage:_ZFS_over_iSCSI
SSH Enablement on TrueNAS
Enable SSH and Autostart on TrueNAS
- System Settings => Services => SSH make sure it’s running and on auto start
Temporary Allow Root Login whilst performing this procedure
- Credentials => Local Users => Edit Root => Scroll to “SSH password login enabled”
Create the SSH key and copy across
Surprisingly this is one of most complicated bits of the installation. The reason is TrueNAS scale prompts you to use an admin user, so the root user is actually never even set up.
On the Hypervisor:
mkdir /etc/pve/priv/zfs
This directory might already exist if you’re running a Proxmox cluster and you’ve already installed the iSCSI plugin on another host.
In the code sample below, replace 192.168.1.22 with the IP address of your TrueNAS server.
ssh-keygen -f /etc/pve/priv/zfs/192.168.1.22_id_rsa
ssh-copy-id -i /etc/pve/priv/zfs/192.168.1.22_id_rsa.pub [email protected]
Login from each Node
Login once to the ZFS TrueNAS SAN from each proxmox node:
ssh -i /etc/pve/priv/zfs/192.168.1.22_id_rsa [email protected]
Possible SSH Issues
When copying the ID, you may get the following error:
/usr/bin/ssh-copy-id: ERROR: ssh: connect to host a.b.c.d port 22: Connection refused
System Settings => Services => SSH make sure it’s running and on auto start
Note: Even after starting SSH, you might run into this problem next:
[email protected]: Permission denied (publickey).
Make sure you’ve temporarily enabled root login with password. And turn it off again after logging in from each node.
Create first ZFS Pool on TrueNAS Core
After TrueNAS scale has been installed and it’s working on your network, we can proceed to configure ZFS. The ZFS creation for a default installation is super easy because you only have to choose the pool name and the layout. Everything else is optional and can be ignored (unless you’re using NVMe for cache).
Steps:
Storage => No Pools => Create Pool
Name: pool (I used lowercase)
No Encryption
Next, choose the Data layout. The options are and mostly depends on how many drives and what size files:
Stripe, Mirror, RAIDZ1, RAIDZ2, RAIDZ3, dRAID1, dRAID2, dRAID3
We choose, type: RAIDZ1 (3 disks)
You can skip all the optional steps below by just going to save.
Log (Optional). We ignore and go to the next step.
Spare (Optional). We ignore and go to the next step.
Cache (Optional). Ignore unless you have spare NVMe, the use it.
Metadata (Optional). Ignore, and go next.
Dedup (Optional). Ignore, and go next.
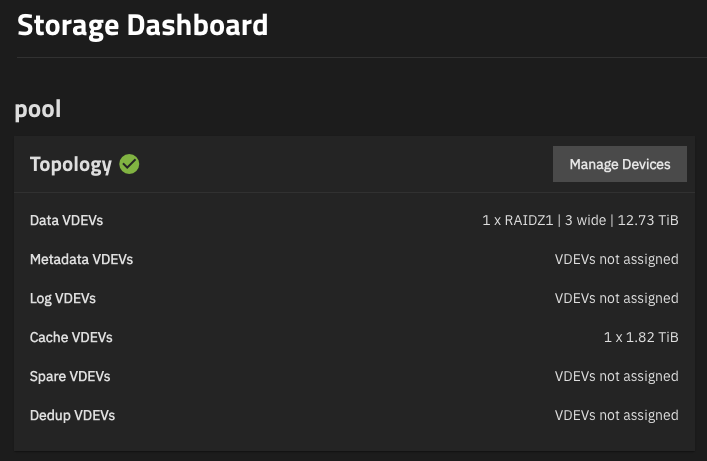
If you also have NVMe, you can use that as Cache VDEVs.
When you’re done, your Storage Dashboard will look something like this:
Set up the Portal
You’ll have to set up the iSCSI portal on the TrueNAS side. This is by far the most complex part because if it fails on the TrueNAS side, you don’t have any clear ways to test.
System Settings => iSCSI make sure it’s running and on auto start
Configuring the TrueNAS Host for iSCSI
This was hard. If you’ve never used iSCSI then it’s difficult to figure out where what must go. There are all kinds of checkboxes and ticks and if you miss a single one you’re out of business. A a Proxmox forum community member made good documentation with screenshots.
Many of the screenshots presented here seems obvious and they are.
SSH
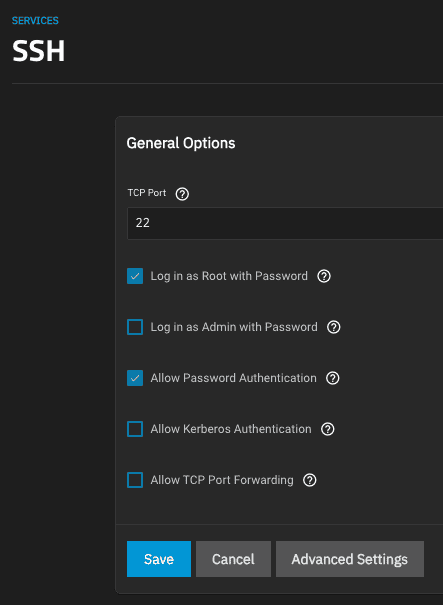
Please note! Password must be enabled in Credentials! Except on the latest version of TrueNAS Core that Log in as Root with Password box is missing!
Edit
- Log in as Root with Password
- Allow Password Authentication
iSCSI
System Settings => iSCSI make sure it’s Running and Start Automatically
Move the cursor over to the Edit pen icon
Target Global Configuration
The base name may be left at default, so you’ll see this:
Base Name => iqn.2005-10.org.freenas.ctl
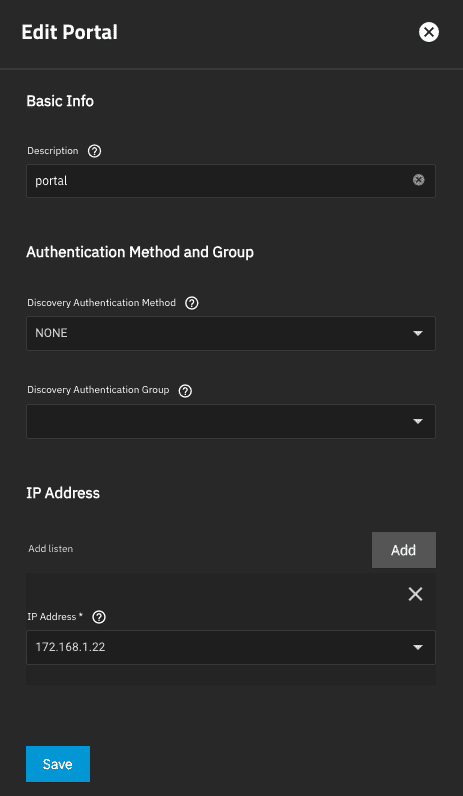
Portals
Add a new Portal, top right.
Basic Info / Description. I called mine ‘portal’.
I didn’t select discovery authentication method nor the discovery authentication group
It’s important to add the listen IP address of the TrueNAS server, otherwise it won’t accept any network requests on the interface:
Intiators Groups
Allow all initiators

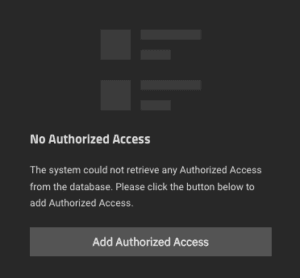
Authorized Access
Leave as “No Authorized Access”.
Targets
- In target, I called my Target simply
target. This will later used when configuring the Proxmox UI’s iqn. - Authorized Networks: Specify the local network /24
- iSCSI Group: Add Portal Group ID 1, and ALL Initiators Allowed
For a test environment, choose Authentication Method None
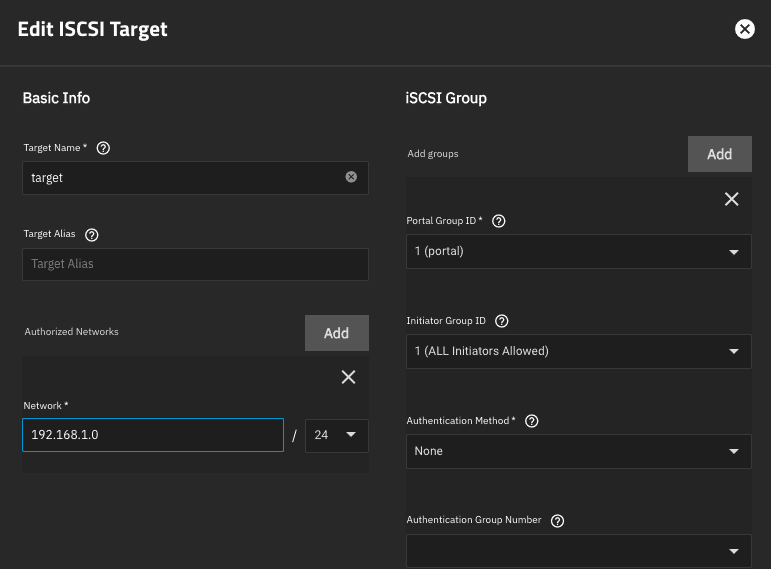
Note: The Target UI has a bug with saving. Change the target name and back again and save will be highlighted.
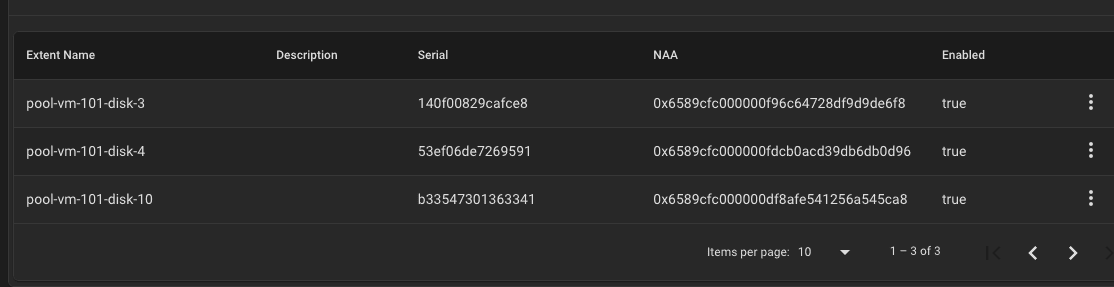
Extends
Extents will later populate itself as SSH commands are invoked to create them. On a running system you’ll see this, but we warned, often when SSH is working but the API not, you’ll still see this!
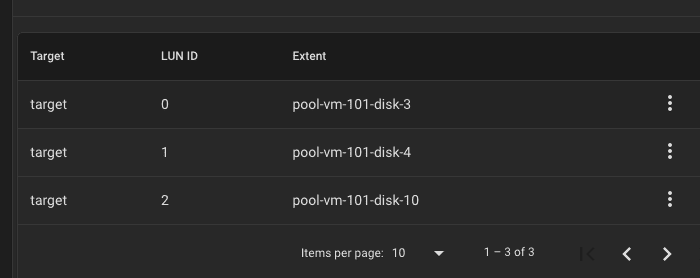
Associated Targets
This will also populated itself and this is what I see on a working system:
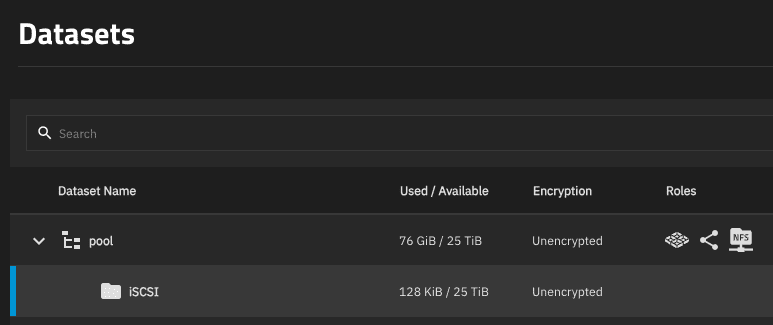
Datasets
pool
The assumption is that you have already created a pool. The most important step here by Datasets is create a Dataset under the pool.
Configure the Proxmox VE UI
In this section we’ll move over to configuration of the Proxmox VE user interface. The is the final step and the hardest to get right because testing isn’t obvious.
Datacenter => Storage => Add => ZFS over iSCSI -> Choose FreeNAS-API
The settings, to summarize:
- ID is the name of the disk, e.g. NAS01
- Portal and API host is the same, it’s the TrueNAS IP address
- Pool is what you chose above
- ZFS Block Size should be
8k16k (see https://forum.proxmox.com/threads/whilst-move-storage-from-local-lvm-to-truenas-zfs-over-iscsi-warning-volblocksize-4096-is-less-than-the-default-minimum-block-size-8192.135053)- As of recently ZFS complains about 16K blocks.
- See here for actual settings in TrueNAS:
- https://www.truenas.com/community/resources/zvol-blocksize-modifier.233/
- And here about new 16k standard:
- https://www.truenas.com/community/resources/zvol-blocksize-modifier.233/
- See here for actual settings in TrueNAS:
- As of recently ZFS complains about 16K blocks.
- Rest of values continue
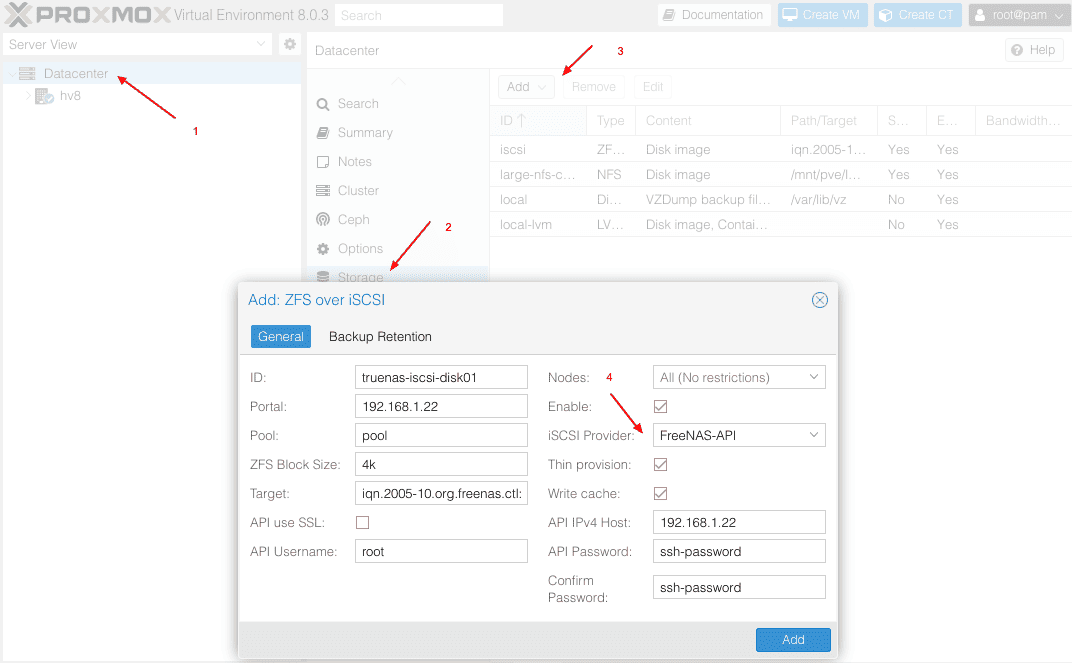
Here is a breakdown of the rest of the values that you must enter. Some super basic defaults have been shown in the diagram, but Target is of note because some of the text is cut off. Let me tell you entering Proxmox VM values are easy – getting them to match up with what’s going on in TrueNAS is hard! It took quite a bit of trial and error to get this going.
ID => The common name that you are going to refer to the disk. Internal to Proxmox.
Portal => The IP address of the TrueNAS server
Pool => The name of the pool as you’ve defined it in TrueNAS. We’ll include some screenshots for this.
Target => iqn.2005-10.org.freenas.ctl:target
API use SSL => Do not select. For some reason most tutorials suggested this and since this is complex I would stick to not ticking it until you have the entire system working.
Thin provision => Tick. I have no idea why anyone wouldn’t want thin provisioning 🙂
API IPv4 Host => The IP address of the TrueNAS server. Same as Portal.
API Password => This should really be called SSH password because that’s exactly what you must fill in here.
If everything has gone well, you can try creating a VM!
Troubleshooting
The unfortunately thing is you can get very far with filling in these values and Proxmox will accept them. It’s only once you start using the disk that you discover that some of the settings might be wrong. Mostly the place to look then will be the TrueNAS host. One quick way to see if you’re up and running is to run this command with your TrueNAS IP address:
iscsiadm --mode discovery --op update --type sendtargets --portal 192.168.1.22
Warning: You’ll get no portals found even though Proxmox and TrueNAS is talking to each other.
After following this whole procedure, you get this problem:
Warning: volblocksize (4096) is less than the default minimum block size (16384).
To reduce wasted space a volblocksize of 16384 is recommended.
TASK ERROR: unable to create VM 137 - Unable to connect to the FreeNAS API service at 'a.b.c.d' using the 'http' protocol at /usr/share/perl5/PVE/Storage/LunCmd/FreeNAS.pm line 380.
That means your iSCSI is not set up to allow this host and you have to follow setting up of a portal.
The `Unable to connect to the FreeNAS API service at ‘a.b.c.d’ using the ‘http’ protocol` error is particularly nasty and sometimes goes with this:
2024-06-05T17:11:44.072085+02:00 hv11 pvedaemon[903040]: unable to create VM 138 – Unable to find the target id for iqn.2005-10.org.freenas.ctl:target at /usr/share/perl5/PVE/Storage/LunCmd/FreeNAS.pm line 259.
This problem happened in my cluster when I added more NASses. The things I tried:
- Redo the password on the TrueNAS side
- Retype the password on the Proxmox side
- Enabled/disabled password login
You should also test the API connectivity. In the end, I added a new node to the NAS broadcast and didn’t do much else and then it just started working!
Testing the API:
curl -k -I http://a.b.c.d/api/
More troubleshooting:
Also CHECK password allow is on!
For starters, your Shares / Sharing / Block (iSCSI) Shares Targets will be stopped.
Start it
Also this is NB:
System Settings => Services iSCSI must be running and started automatically!
Connecting from Debian/Ubuntu
We’ve documented some steps if want to create an EXT4 volume on a ZFS disk.
The steps are:
- Install the
open-iscsipackage - Check discovery to identify your portal
- Login to your portal
- Use
lsblkto identify the drives available in your portal - Use
fdiskto create a partition - Make a mount point
- Mount the drive
Here is a transcript:
# apt install open-iscsi

# iscsiadm --mode discovery --type sendtargets --portal 192.168.1.25
192.168.1.25:3260,1 iqn.2005-10.org.freenas.ctl:target

# iscsiadm --mode node --targetname iqn.2005-10.org.freenas.ctl:target --portal 192.168.1.25 --login
Logging in to [iface: default, target: iqn.2005-10.org.freenas.ctl:target, portal: 192.168.1.25,3260]
Login to [iface: default, target: iqn.2005-10.org.freenas.ctl:target, portal: 192.168.1.25,3260] successful.
If you’re already logged into the portal, you’ll get this. It’s possible to simply change login to logout but don’t do this when are already using the drives!
# iscsiadm --mode node --targetname iqn.2005-10.org.freenas.ctl:target --portal 172.168.1.25 --login
iscsiadm: default: 1 session requested, but 1 already present.
iscsiadm: Could not log into all portals
Create a partition and mount the disk:
fdisk /mnt/sdX
m
exit and save
mkdir /mnt/iscsi-disk
mount /dev/sdd1 /mnt/iscsi
You can print information about your current iscsi session once you’ve completed this procedure. Note, on a Promox VE ZFS over iSCSI, the session won’t print anything instead you’ll see iscsiadm: No active sessions.
# iscsiadm --mode session --print=1
Target: iqn.2005-10.org.freenas.ctl:target (non-flash)
Current Portal: 172.168.1.25:3260,1
Persistent Portal: 172.168.1.25:3260,1
**********
Interface:
**********
Iface Name: default
Iface Transport: tcp
Iface Initiatorname: iqn.2004-10.com.ubuntu:01:649f58d5b124
Iface IPaddress: 172.168.1.26
Iface HWaddress: default
Iface Netdev: default
SID: 3
iSCSI Connection State: LOGGED IN
iSCSI Session State: LOGGED_IN
Internal iscsid Session State: NO CHANGE
iscsid.conf
For authentication information, see this file:
> /etc/iscsi/iscsid.conf
Relevant sections in this file:
node.session.auth.authmethod = CHAP
node.session.auth.username = root
node.session.auth.password = secret
For information on adding a ZFS share, go here:
https://www.truenas.com/docs/core/coretutorials/sharing/iscsi/addingiscsishare/
Troubleshooting
Troubleshooting this setup can be complex. Once can make a mistake anywhere along the way and be pretty screwed. What interesting about this setup is SSH works in conjunction with the API. So SSH might be working, but if the API isn’t, you have a new problem as testing API connectivity is undocumented. To quote:
My issue was ridiculous…after lots of testing and fiddling around, I figured out that Proxmox was connecting to TrueNAS over SSH and running the appropriate commands successfully. Afterwards, it connects to the API over 80/443 to perform additional functions. The API listens on the same interfaces that the WebGUI is configured to listen on. On TrueNAS, going to System>General and adding my storage network to the Web Interface IPv4 address, everything started working properly.
Reference: https://forum.proxmox.com/threads/guide-setup-zfs-over-iscsi-with-pve-5x-and-freenas-11.54611/page-2
Command to test SSH connectivity
/usr/bin/ssh -o 'BatchMode=yes' -i /etc/pve/priv/zfs/1.2.3.4_id_rsa [email protected] zfs get -o value -Hp available,used pool
After Node Restart, no ISCSI
Through lots of trial and error I eventually discovered that the iscsiadm command is your friend, but only once things are working.
qm start 147
WARN: iothread is only valid with virtio disk or virtio-scsi-single controller, ignoring
Unable to connect to the FreeNAS API service at '192.168.1.21' using the 'http' protocol at /usr/share/perl5/PVE/Storage/LunCmd/FreeNAS.pm line 380.
Solution; discover again and try again:
Warning: You’ll get no portals found even though Proxmox and TrueNAS is talking to each other.
iscsiadm --mode discovery --op update --type sendtargets --portal 172.168.1.21
SSH
Use this command to see if your SSH setup is working:
ssh -i /etc/pve/priv/zfs/192.168.1.22_id_rsa [email protected]
Don’t continue until the SSH is working
Using iscsiadm discovery
This command can be run on the Proxmox host, but only _after_ iSCSI has properly connected:
Working
# iscsiadm --mode discovery --op update --type sendtargets --portal 192.168.1.22
192.168.1.22:3260,1 iqn.2005-10.org.freenas.ctl:target
Not working
# iscsiadm --mode discovery --op update --type sendtargets --portal 192.168.1.22
iscsiadm: No portals found
What stands out about the above working reply is that iSCSI’s TCP port is 3260, and id of 1 is returned and it’s called iqn.2005-10.org.freenas.ctl and final there is colon : separation between the iqn thingie and the name of the target. The target in this case has simply been called target.
If you click in the user interface and you just see the new disk hanging, you might also see this output:
/usr/bin/ssh -o 'BatchMode=yes' -i /etc/pve/priv/zfs/portal_id_rsa root@portal zfs list -o name,volsize,origin,type,refquota -t volume,filesystem -d1 -Hp pool
Using iscsiadm loginall
During troubleshooting I was advised to use this command:
# /sbin/iscsiadm -m node --loginall=automatic
iscsiadm: No records found
I never got that working in spite of having a working system. If anyone can comment what on earth this command is supposed to do I would be really appreciative.
Block Size Warning During Moves
You may see this warning:
create full clone of drive scsi0 (local-lvm:vm-101-disk-0)
Warning: volblocksize (4096) is less than the default minimum block size (8192).
To reduce wasted space a volblocksize of 8192 is recommended.
<snip>
To get some insight into this error, and also make your head hurt, go here:
https://github.com/openzfs/zfs/issues/14771
Reference
This article was built mostly inspired by this post:
https://forum.proxmox.com/threads/guide-setup-zfs-over-iscsi-with-pve-5x-and-freenas-11.54611/page-2