Background
Sooner rather than later your servers and routers will be attacked. This is especially so if you run a large network (>100 servers), and you have many different client workloads that you do not control. You might even control the workloads, such as web servers, but even so, maximum protection and pro-active response is always key. If you don’t monitor your network, and have good access to logs, you may be blind to what is happening. For the logging SSH is required, for the monitoring great SNMP with threshold notifications is required.
To make thing clear, all servers have a firewall. I haven’t installed a server without a firewall in decades. The problem isn’t the firewall or even the OS getting breached. Linux is a mature technology and doesn’t easily get breached, even on shared systems. The problem is denial of service, sometimes unintentionally, when a hacker tries to brute force a system. Just one IP address, on a fast network of 10 Gbit/s or more, can raise the temperature. Literally. Basically what happens is the attacker tries to breach xmlrpc on WordPress, or even just login.php, and soon your server’s CPU cycles, and the disks, get consumed by the work it has to perform. The web server has to check the database has to be fetched from disk. Repeat this every second or millisecond and CPUs work hard, making hypervisors also work harder. A very hard working (100%) CPU will raise the temperature. SNMP monitoring your core temperatures? If you get warnings this is the first sign something SERIOUS is wrong.
Even if you don’t have a border firewall, you have Proxmox and it’s built-in firewalls. Here are some key concepts to understand when working with Proxmox and it’s firewall.
Planning
- Setting up a firewall properly requires though and planning. To keep things tidy when you have 100+ servers, we recommend a spreadsheet, with tabs to keep track of groups of servers. For example, web and email servers technology A, web and email servers, technology B, fort know servers, no SSH servers, etc.
Basics
- Be prepared to test and revert. Proxmox has power technology but don’t “assume” you’ve done it right. You will an external system, with SSH and NMAP, to test. Even just telnet will do the job. I use SSH to remote system, telnet
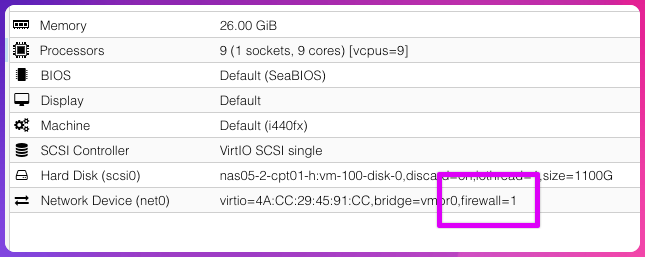
xyz.example.com portto test. Do something, test. Revert something, test. - If your experiments are not working, ensure the firewall is on at the interface level. This caught me out many times:
Concept
- Proxmox has three firewall levels and it’s key to understand all three to do this properly. Furthermore Proxmox has a more advanced firewall than the default one. This article isn’t about the more advanced one. It’s about the stock one that comes with Proxmox.
VM Level Firewall
- The VM firewall. This is OFF by default. The VM is YOUR responsibility. If you switch it on, and everything suddenly stop working, then look here:
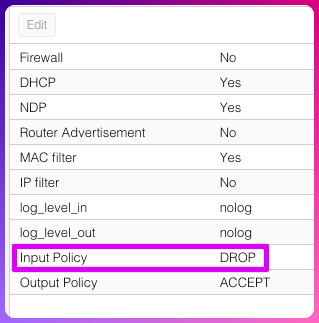
If you study the screenshot for the VM you can see two things, (1) It’s off by default. (2) The default input policy is DROP.
If you are hosting a web server, an email server, or anything else that requires outside access, you cannot just switch it on as all traffic from the outside to the inside will fail. So you have to first add an ACCEPT rule. One you have allowed your server to keep on functioning, you can move over to the next level which is the DROP rule. Rules are order specific and you’ll see if you add a new rule it be added always to the top.

- First drop those special pricks that attack the server.
- Then accept all other traffic.
You might say “accept all other traffic” sounds dodgy. In our introduction we mentioned that most servers already have a firewall. Duplicating rules if you already have a server firewall might lead to serious administrative and troubleshooting issues, but if you’re that way inclined and need the control on the server, by all means.
Node Level Firewall
This is ON by default. Don’t get confused, protecting the Node won’t help to protect the VMs. The firewall on the Node level is to protect the node. That’s why on the node level you don’t see Input and Output policies like on the VM level.
Cluster Level Firewall
This is also ON by default. There is a way to create forwarding rules that deny to everyone on this level, but the setup is beyond the scope of this document. Specifically:
While all configuration is stored on the cluster file system, the iptables-based firewall service runs on each cluster node, and thus provides full isolation between virtual machines. The distributed nature of this system also provides much higher bandwidth than a central firewall solution.
– https://pve.proxmox.com/wiki/Firewall
To understand why this document doesn’t have information about “protecting everything”, see this in the same document:
Creating rules for forwarded traffic is currently only possible when using the new nftables-based proxmox-firewall. Any forward rules will be ignored by the stock pve-firewall and have no effect!
Default Ports
The cluster level firewall will automatically protect all the nodes from the outside. If you need inter-cluster communication, here are the ports used by Proxmox VE:
- Web interface: 8006 (TCP, HTTP/1.1 over TLS)
- VNC Web console: 5900-5999 (TCP, WebSocket)
- SPICE proxy: 3128 (TCP)
- sshd (used for cluster actions): 22 (TCP)
- rpcbind: 111 (UDP)
- sendmail: 25 (TCP, outgoing)
- corosync cluster traffic: 5405-5412 UDP
- live migration (VM memory and local-disk data): 60000-60050 (TCP)
Here is another checklist when working with Proxmox and it’s firewall:
- If you’re doing this in bulk, break your servers down in categories
-
Use a spreadsheet with tabs to keep things tidy
-
Plan for random attacks from random IPs. It’s not ideal to filter out one IP address but sometimes you’ll have to.
-
Have a test bed, you can measure if you can’t test.
-
The firewall has to be enabled on at least these places if you want to protect a VM:
- Network interface card (off by default)
- VM (off by default, be careful when enabling due to default DROP)
- Node
- Cluster
-
The firewall is already enabled by default on the cluster, to protect the cluster from the outside.
-
Don’t use uppercase. It will translate to lowercase but you’ll have to rebind to all places where it’s used.
-
If you rename group or IP sets, you might have to rebind to all places where it is used. So choose a good name and be careful if you rename! You must be willing to audit every single place that group is used and finding it retrospectively isn’t easy.
-
If you have a group on the cluster level, you’ll only see logging in the node and not at the VM level.
- The logging shows the VM ID or 0 if it’s node. VM ID is super useful!
- Always turn on warning when logging drops to see if attackers are persisting.
-
The more rules you bulk into security group, the harder to troubleshoot. Start small with one port, and only group when you have 100% certainty about the group. Grouping too many things also makes logging more difficult to read.
-
Remove rules that are stale and old. Less is more with a firewalll.
-
You don’t need to log allow rules and you probably shouldn’t from a performance point of view.
- Virtualmin tips:
-
Here are some sane rules for protecting a Virtualmin server:
- Make sure Virtualmin’s firewall is on
- Make sure there is service monitoring for both firewalld and fail2ban
-