Table of Contents
Background
LVM is normally easy to resize but on a VM you can also easily resize if you have EXT4 and no LVM. This article first covers the use case where it’s plain EXT4 and then if you have LVM.
There are a few steps as things are layered. Proxmox VE controls the VM has the OS has the disk partitions has the file system. The outline of the steps are:
- Resize disk in Proxmox VE.
- Use
fdiskto learn current layout and if Proxmox resize worked. - Use
partedto fix the GPT PMBR size mismatch. - Use
partedto resize the correct partition number. - Use
resize2fsto resize the actual file system.
Quick TL;DR Guide
- 1st resize the disk in Proxmox
- Then in the terminal:
- parted /dev/sdX (probably
a)- print / yes to fix / resizepart Y (probably
1) - quit
- print / yes to fix / resizepart Y (probably
- resize2fs /dev/sdXY
- parted /dev/sdX (probably
- df -h
Longer Guide with Explanation
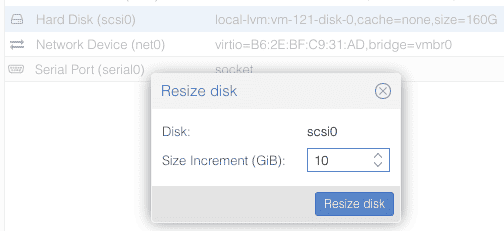
First resize the disk in Proxmox:
Next use root to do this command sequence:
fdisk -l should show which disks are there. Typically /dev/sda
If you get this message which seems like an error, the resize in Proxmox worked:
GPT PMBR size mismatch (167772159 != 314572799) will be corrected by write.
The backup GPT table is not on the end of the device. This problem will be corrected by write.
The example above is resizing from 80 GB to 150 GB.
Under some conditions you might now get the above warning. We have seen this on a secondary disk /dev/sdb that was about to be resized. Everything was perfect in Proxmox with the resize, but that warning didn’t show.
Next use parted:
# parted /dev/sda
Then this command
Next you’ll get an Warning which allows you to “correct” the first error:
Warning: Not all of the space available to /dev/sda appears to be used, you can fix the GPT to use all of the space (an
extra 146800640 blocks) or continue with the current setting?
Fix it, do this:
Fix/Ignore? F
Next you’ll see this output, it indiciated our 80 GB drive is to be enlarged and it’s partition # 1:
Disk Flags:

Number Start End Size File system Name Flags
14 1049kB 5243kB 4194kB bios_grub
15 5243kB 116MB 111MB fat32 boot, esp
1 116MB 85.9GB 85.8GB ext4
Now resize the partition, still in parted:
(parted) resizepart 1
It will tell you the partition is in use. It’s safe to continue.
Warning: Partition /dev/sda1 is being used. Are you sure you want to continue?
Yes/No? y
Next tell the system to use all the new space by typing 100%
End? [85.9GB]? 100%
Then quit
quit
At this point you still have to resize the file system:
# resize2fs /dev/sda1
resize2fs 1.45.5 (07-Jan-2020)
Filesystem at /dev/sda1 is mounted on /; on-line resizing required
old_desc_blocks = 10, new_desc_blocks = 19
The filesystem on /dev/sda1 is now 39293179 (4k) blocks long.
Check if resize worked:
# df -h
Resize Proxmox Volume with LVM
Four utilities are required, but use lsblk throughout to check progress. The following example assumes a Debian install with defaults, e.g. the LVM volume is called pbs-root
- parted /dev/sdx
- print and Fix
- resizepart and choose correct partition and instead of size put 100%
- pvresize /dev/sdXY e.g. pvresize /dev/sda3
The caveat is using X and Y, disk and partition number.
- lvextend -l +100%FREE /dev/mapper/pbs-root
- resize2fs /dev/mapper/pbs-root
Here is another complete example:
- parted /dev/sda
- fix
- resizepart 3
- pvresize /dev/sda3
- lvextend -l +100%FREE /dev/mapper/ubuntu–vg-ubuntu–lv
- resize2fs /dev/sda3
- resize2fs /dev/mapper/ubuntu–vg-ubuntu–lv
- df -h
2 thoughts on “How to enlarge an EXT4 or LVM disk on an Ubuntu Proxmox VM”
Extremely helpful article, thank you so much!
Thanks for the demo and info, have a great day